Things you need include: Photoshop and the video you want to gif, preferably taken with a tripod. If your video wasn’t taken with one it’s not the end of the world, but that’s how I achieve cinemagraph-like images that have only specific areas that are moving.
1. Trim your video
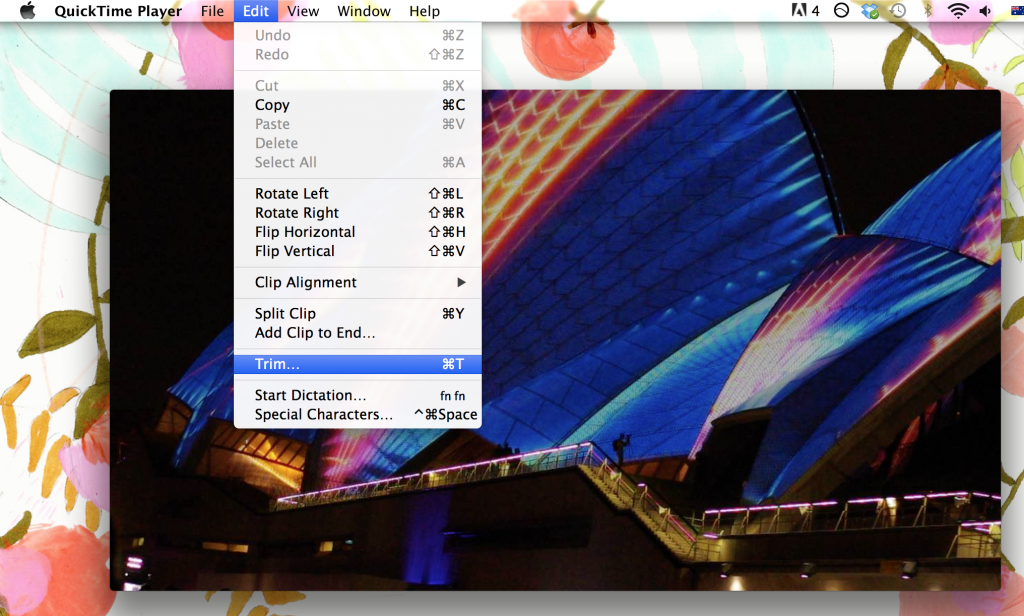
First thing’s first – cut down your video to the section you want. It’s best if the first and last frames are similar so that it loops smoothly, but if you can’t it’s fixable later on! By the way I trim my videos with Quicktime Player, although any other video editing software’s just fine. I only cut my video down to about four seconds, since that’s all you really need. Besides, the longer the clip the bigger the file size, so that’s something I try to avoid when I can.

2. Import footage into Photoshop
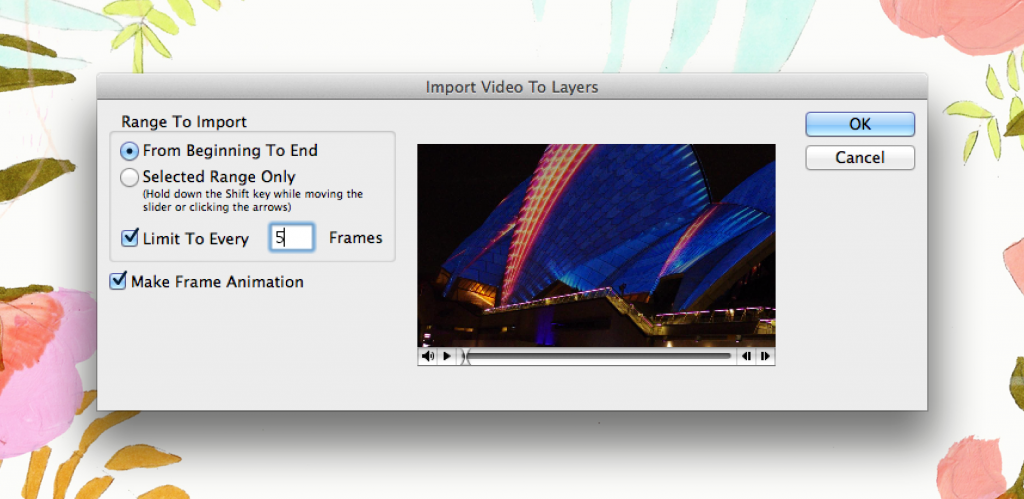
Open up Photoshop and click on File > Import > Video frames to layers… Select the video you just trimmed, and this window should pop up. I try to limit it to every 5 frames since I don’t want a big file size, and the gif will play too slowly if there are too many of them. Don’t take my word for it though, experiment with what works for you!

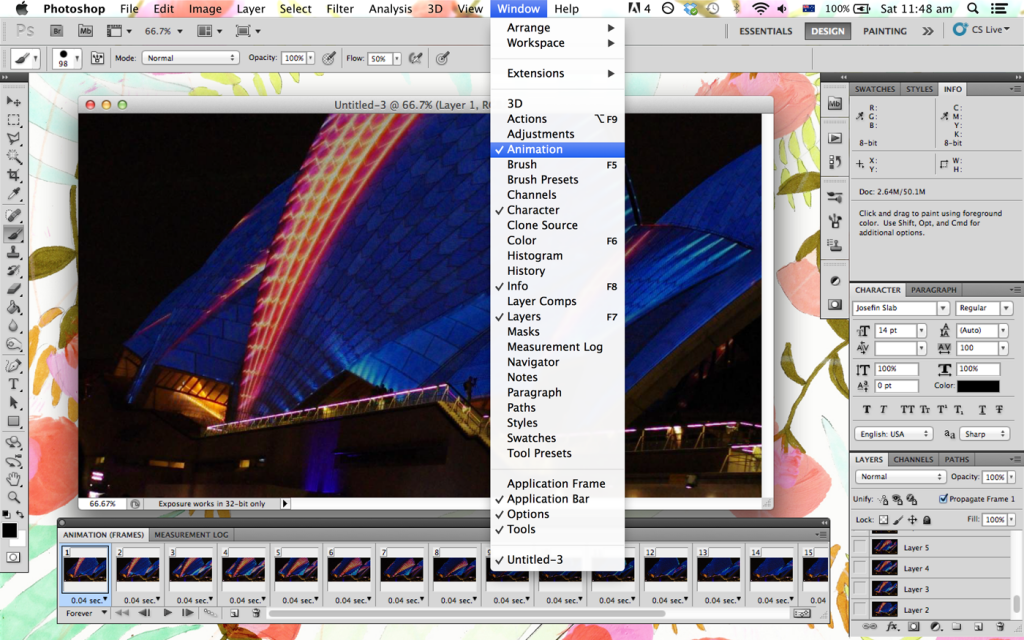
You’ll need the Animation window, so if you can’t see it go to Window > Animation. Your workspace end up looking something like this:

3. Edit your image
If you want to adjust your image in any way, now’s the time to do it. At this point, I usually resize my image so that it loads faster. Also, use adjustment layers if you want to edit things like exposure and curves, since it changes all the layers underneath (and therefore, all of your frames)! Simple click through to Layer > New Adjustment Layer, and the following options should show up:

4. Create mask layer
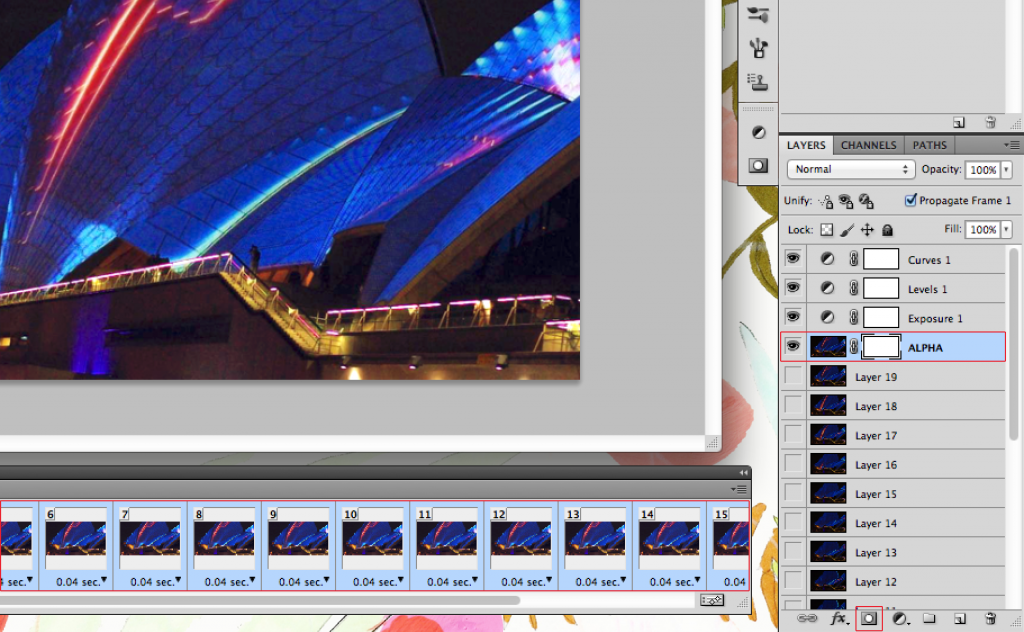
You can stop here if you’re satisfied, but here’s the secret to making only certain parts of your gif animated. Right click and duplicate your top layer, and name it something generic like ‘Alpha’. Then select all your frames in the animation window, and select your Alpha layer on the righthand side. Click the mask button (box with a circle in it) on the bottom right, and then make sure that the Alpha layer’s visible and has the eye symbol showing next to it.

5. Define masked area
Select the paint brush tool and use black to colour in the areas where you want movement in your image. In my case, I only shaded the Opera House sails and ignored any areas that I wanted to remain stationary. Whatever you draw should show up on your layer mask (as shown in the red box), so do that and keep testing how it looks by pressing the play button in the animation window. If you make a mistake, just erase it by changing the paint brush to white instead!

6. Create reversed frames
At this point, you can save your gif if you’re satisfied. However I usually want a smooth animation loop, so I do this last step. First, select all of your frames except for the last one (in my case, frames 1-14). Select the toolbar in the animation window and choose ‘Copy Frames’. Then select your last frame (frame 15), click the same toolbar as before and click Paste Frames… > Paste after selection.

While these new, duplicated frames (numbered 16-29) are still selected go back to the toolbar, then click ‘Reverse Frames’. Voila! Your animation should now reverse back to its first frame and make a never ending loop. Keep in mind though, the reverse animation will look better for some videos than others.

7. Finishing touches
After this I try to delete any unnecessary frames at the beginning and end, especially if I want to reduce the gif’s file size. Then I simple go to File > Save for Web and Devices… where you can save it in the right format, or make changes to adjust the file size.
So, that’s pretty much how I ended up with the gif you see above! While it may seem like a lot to take in, practice really does make perfect. Even I’m constantly finding new things when it comes to Photoshop and this sort of thing… Anyway, if there was anything unclear about the tutorial feel free to ask, and happy gif-making!


